WebVTT (Web Video Text Tracks)
WebVTT is a relatively new standard for captions and subtitles published by the World Wide Web Consortium (W3C). The acronym stands for “Web Video Text Tracks.” The standard was originally proposed and drafted by the Web Hypertext Application Technology Working Group (WHATWG), a collaborative community focused on the evolution of HTML and the development of APIs needed for Web applications.
History
In 2010, the group began discussions about what should be the standard caption format for HTML5, and in particular, whether to adopt the XML-based TTML standard or develop an entirely new standard based on the SRT format. TTML had the advantage of being an existing, mature, and full featured standard, but had the disadvantage of being somewhat complex. On the other hand, a new SRT-based standard had the advantage of SRT’s broad popularity lightweight syntax.
The group ultimately decided on the new standard, and initially named it WebSRT. It was later renamed to WebVTT and taken over by newly established working group within the W3C, the Web Media Text Tracks Community Group. In November of 2014, the new W3C group published the first working draft of WebVTT. WebVTT gained traction quickly within the web community, including support of basic features by all major browsers.
Advanced Capabilities
You may be wondering why the working group just didn’t adopt SRT as the standard. The reason is that they wanted to support the following advanced features:
- Basic inline text formatting—Basic HTML tags can be inserted to format either an entire caption (aka cue) or just portions of it. Formatting options include bold, italic, and underlined text
- Advanced Styling via External CSS—Individual cues or groups of cues can be styled using cascading style sheets (CSS). The CSS can be in a separate file, the companion HTML document, or embedded in the WebVTT file itself.
- Voice Tags—Tags can be used in cues to indicate who is speaking. Each speaker’s subtitles can have a unique style.
- Ruby characters—Ruby characters are small textual annotations (i.e. glosses) placed above or alongside logographic characters (e.g. Chinese script or Japanese Kanji) to show the pronunciation of characters that are likely to be unfamiliar to the reader.
- Regions—Areas of the screen (regions) can be defined, and each cue can be directed to any defined region.
- Positioning—The location on the screen may be specified on a cue-by-cue basis or via defined regions that are referenced by captions.
- Alignment and Direction—Text can be left, right, or center-aligned within the caption box, and the horizontal (left-right) and vertical (up-down) text direction can be specified as well.
- Rendering Style—Pop-on, Paint-on, and Roll-up captions are supported. Also, inline timers can be used for karaoke style captions.
While special versions of SRT supported some of the above, the support was inconsistent and incomplete. WebVTT incorporates these features into the standard, so that any web browser or video player claiming 100% support for WebVTT can be relied upon to support these capabilities.
Format
Although the format of WebVTT is very similar to SRT, there are some notable differences:
- The first line of a WebVTT file must start with “WEBVTT,” whereas an SRT file starts with the first caption group (aka cue).
- An optional header can be inserted after the first line. If the header is not inserted, then a blank line must be inserted before the first caption group.
- WebVTT uses periods as the fractional separator for timestamps, whereas SRT uses commas.
- Timecode hours are optional.
- The frame numbering/identification preceding the timecode is optional.
- Metadata frames identified by the word NOTE can be added.
- The only supported extended character format is UTF-8.
- The SRT <font> tag is no longer supported. Instead, individual cues and classes of cues are styled using CSS that is defined in a separate file, the companion HTML document, or embedded in the WebVTT file itself.
File Structure
WebVTT files consist of the following sections:
- header block
- style blocks (optional)
- region blocks (optional)
- comment blocks (optional)
- cue blocks
In its simplest form, a WebVTT file might look like this:
WEBVTT

00:00:00.000 --> 00:00:04.000
Where did he go?

00:00:03.000 --> 00:00:06.500
I think he went down this lane.

00:00:04.000 --> 00:00:06.500
What are you waiting for?

...
In the above example, there is only a minimal header (e.g. “WEBVTT”), there are no style, region, or comment blocks, and the cue blocks are basic, with no advanced features such as formatting or positioning. The header and cue blocks are discussed in more detail below. The style, region, and comment blocks are covered under Advanced Features.
Header
The first line of a WebVTT file must start with “WEBVTT.” Optional header metadata can be inserted after the first line. If included, it should consist of one or more lines in the following format:
<name>: <value>
The header is terminated by a blank line at the end. The following example indicates what a typical header might look like:
WEBVTT
Kind: captions
Language: en-US
Channel: CC1
Station: Online ABC
ProgramID: SH010855880000
ProgramType: TV series
ProgramName: Castle
Title: Law & Murder
Season: 3
Episode: 19
PublishDate: 2011-03-28
ContentAdvisory: TV-14

...
Cue Blocks
Cue blocks hold the actual subtitles. They appear after the header, style, and blocks. Each cue block contains:
- an optional cue identifier
- cue timing, optionally followed by cue settings
- the cue payload (e.g. the text of the subtitle)
The following example shows three cue blocks, each with a cue identifier (the sequential number at the beginning of each cue).
1
00:00:00.498 --> 00:00:02.827
Here's why I love science.

2
00:00:02.827 --> 00:00:06.383
It helps us answer the basic
questions we all ask
at one time or another.

3
00:00:06.383 --> 00:00:09.427
For example:
"Why is the sky blue?"
Cue identifiers are a single line of text used to uniquely identify the cue. They could be as simple as sequential numbers beginning with 1 (e.g. as in an SRT file), or they could have text names, such as “Credits” or “Caption Copyright Notice.” Each identifier must be unique across all other cue identifiers in the file. They can be referenced from external style sheets in order to provide specific styling for individual cues.
Cue timings are formatted as follows:
hours:minutes:seconds.milliseconds -> hours:minutes:seconds.milliseconds
The first timestamp indicates when subtitle should appear, relative to the beginning of the video, and the second timestamp indicates when it should disappear. The “hours” segment is two or more zero-padded digits, “minutes” and “seconds” are two zero-padded digits, and “milliseconds” is three zero-padded digits. For example, the following cue timings indicate that the subtitle should appear at a time that is one hour, seven minutes, 32 seconds, and 53 milliseconds after the beginning of the media, and disappear one hour, seven minutes, 35 seconds, and 500 milliseconds after the start of the video:
01:07:32.053 -> 01:07:35.500
Cue settings may optionally appear at the end of the cue timing line, and take the format: “name:value name:value …” For example:
01:07:32.053 -> 01:07:35.500 position:10%,line-left align:left size:35%
Don’t worry too much about what the settings in the above example mean. Positioning and alignment will be discussed in more detail under the Advanced Features section below.
Cue payloads are the subtitle text that is to be displayed on the screen. They come immediately after the cue timing line, and can be one or more lines in length. Line separators will be preserved. That is, even if the combined text of two lines would fit on one line, the subtitle will still be presented on two lines as indicated in the file. However, if a line will not fit the width of the cue box (aka caption box), it will be wrapped, not truncated.
Comment Blocks
Comment blocks can appear almost anywhere in the file, except within another block. They are denoted by a line that begins with the word “NOTE.” All non-black lines that follow are part of the block. A blank line terminates the comment block. Additional text can also appear on the same line as “NOTE” as long as it is separated by a space. The following example shows comment blocks used in various ways:
WEBVTT
Kind: captions
Language: en-US

NOTE
Copyright (c) 2016 by XYZ Company
All rights reserved

NOTE - Revisions
05/10/2016 09:20 AM - Revision 1.0 - First draft. TBD: Positioning
05/13/2016 06:13 PM - Revision 1.1 - Positioning completed.
05/14/2016 12:25 PM - Revision 1.2 - Review completed. Final draft.

NOTE ==== Beginning of Cues ====

00:01.000 --> 00:04.000
Never drink liquid nitrogen.

NOTE I’m not sure the timing is right on the following cue.

00:05.000 --> 00:09.000
— It will perforate your stomach.
— You could die.

NOTE ==== End of file ====
The above example shows both single-line comments and multi-line comment blocks. Comments are shown between the header and the first cue block, and also between cue blocks. Comments can also appear between style and region blocks.
Advanced Features
The basic functionality discussed so far is sufficient for presenting captions that are all styled consistently in the default player format. The following sections discuss advanced features that allow for styling (font, size, color, background, italics, bold, etc.), alignment, positioning, text direction, rendering styles, animation, and more.
Inline Text Formatting
Cue payloads (e.g. subtitle text) can contain the following basic HTML tags: <b> (bold), <i> (italics), and <u> (underline). These tags can be used to format one or more words within a subtitle or the entire subtitle. For example:
00:00:00.498 --> 00:00:02.827
- Johnny, where are you?

00:00:02.827 --> 00:00:06.383
- <i>Over here</i>
- Where?

00:00:06.383 --> 00:00:09.427
Oh, <b>there</b> you are!

00:00:09.427 --> 00:00:12.600
Come over here.
I want to read to you.

00:00:12.600 --> 00:00:16.900
I have your favorite book:
<u>Green Eggs and Ham</u>
In the above example, “Over here” in the second cue is italicized to indicate the speaker is offscreen. “There” in the third cue is in bold to indicate emphasis, and Green Eggs and Ham in the last cue is underlined because it is a book title.
CSS Styling
CSS be used for advanced font styling. For example:
<style>
  video::cue {
    background-image: linear-gradient(to bottom, dimgray, lightgray);
    color: blue;
  }

  video::cue(.bg-yellow) {
    background-color: yellow;
  }

  video::cue(.green) {
    color: green;
  }

</style>
In the above example, first video::cue pseudo-element targets all cues, styling them with a grey gradient background and blue text. The video::cue(.bg-yellow) pseudo-element defines a class that can be used to produce a yellow background. The video::cue(.green) pseudo-element defines a class that can be used to set the font color to green. These classes can be referenced inside of cues to style individual words and phrases. For example:
00:00:00.000 --> 00:00:10.000
This caption with <c.green>green</c> and <c.red.bg-yellow>red</c> is styled using CSS
The caption in the above example would appear on the screen like this:
![]()
CSS stylesheets can also be embedded in WebVTT files using style blocks. Style blocks are placed after the header but before the first cue. They begin with the word “STYLE” on a line by itself and are terminated by a blank line. CSS comments (e.g. /* comment */) are allowed. The CSS example above could be included in a WebVTT file as follows:
WEBVTT

STYLE
/* Default cue styling */
::cue {
 background-image: linear-gradient(to bottom, dimgray, lightgray);
 color: blue;
 }
/* Classes that can be applied to individual cues or phrases */
::cue(.bg-yellow) {
  background-color: yellow;
  }
::cue(.green) {
  color: green;
  }

...
Comment blocks can be used between style blocks.
Voice Spans
Voice spans can be used to indicate which speaker is talking in each cue. For example:
00:00:00.000 --> 00:00:02.000
<v Speaker01>John, is that you?

00:00:02.000 --> 00:00:04.000
<v Speaker02>No, this is Larry.

00:00:04.000 --> 00:00:08.000
<v Speaker01>What are you doing here?</v>
<v Speaker02>Hanging out, just like you.</v>
Notice that voice spans don’t have to be closed if they cover the entire cue text. In the last cue, two speakers each have their own voice span.
Style sheets can style these spans:
::cue(v[voice="Speaker01"]) { color: cyan }
::cue(v[voice="Speaker02"]) { color: lime }
Ruby Characters
Ruby characters (i.e. small annotative characters above other characters) can be included in cues using the following notation: <ruby>base text<rt>annotation</rt></ruby>. For example:
<ruby>見<rt>み</rt></ruby>
In the example above, the み character is placed above the logographic character, 見, to indicate punctuation.
Text Direction
Text direction is specified using the vertical cue setting. If this setting is present, the text is vertical, otherwise it is horizontal (default). Recall that cue settings are appended to the cue timing line and take the format “name:value”. The syntax for the vertical setting is:
vertical:rl|lr
The values rl and lr indicate whether the text will be presented from right to left (rl) or left to right (lr). For example, the following caption would be rendered vertically, from top to bottom and right to left:
00:00:00.000 --> 00:00:02.000 vertical:rl
This line will display vertically, in the rightmost position.
This line will display vertically, to the left of the prior line.
Text Alignment
Text alignment within the cue box (aka captions box) is specified using the align cue setting, which is similar to the CSS text-align property. The syntax for the align setting is:
align:start|left|center|middle|right|end
The following values are synonymous: start/left, center/middle, and right/end. Middle has been replaced by center in newer versions of the standard. The values have different effects depending on the text direction. The following table explains how each value is interpreted for each text direction:
| Horizontal (default) | Vertical | |
|---|---|---|
| align:start align:left |
left | top |
| align:center align:middle |
centered horizontally | centered vertically |
| align:end align:right |
right | bottom |
The following example shows various uses of the align setting:
00:00:00.000 --> 00:00:02.000 align:end
These captions will be aligned
to the right side of the cue box,
producing a ragged left edge.

00:00:02.000 --> 00:00:04.000 align:center
These captions will be centered
horizontally within the cue box.

00:00:04.000 --> 00:00:06.000 vertical:rl align:start
These captions will be displayed
vertically, from right to left,
and aligned at the top edge.
Positioning
The position of the cue box is specified using two cue settings: position and line. These two settings have different meanings based on the text direction. If the text direction is horizontal (default), position specifies the horizontal location and line specifies the vertical location of the cue box. Conversely, if the text direction is vertical, position specifies the vertical location and line specifies the horizontal location of the cue box. In other words, position specifies the location along the axis of the text direction, and line specifies the location along the other axis.
The position value is an integer percentage from 0% to 100% and specifies the distance from the left or right edge of the screen (for horizontal text direction) or the top or bottom of the screen (for vertical text direction). The text alignment also affects the meaning of position. If horizontal text is left-aligned, then position:0% means that the left edge of the cue box is at the left edge of the screen, and position:50% means that the left edge of the box is at the horizontal center of the screen. However, if horizontal text is right-aligned, then position:100% means that the right edge of the box is at the right edge of the screen, and position:50% means that the right edge of the box is at the horizontal center of the screen.
The effect that text alignment has on position can be overridden by explicitly specifying which edge of the cue box is to be positioned. This is done by appending “,line-left” or “,line-right” to the value. For example, for horizontal text, position:100%,line-right specifies that the right edge of the box is at the right edge of the screen, regardless of alignment. For vertical text, position:100%,line-right specifies that the bottom edge of the box is at the bottom edge of the screen, regardless of alignment.
The following table should clarify the behavior:
| Horizontal Text Direction | Vertical Text Direction | |
|---|---|---|
| position:0% align:start | Left edge of cue box is at left edge of screen. | Top edge of cue box is at top edge of screen. |
| position:0% align:center | Center of cue box is at left edge of screen. Left half of box is offscreen. | Center of cue box is at top edge of screen. Top half of box is offscreen. |
| position:0% align:end | Right edge of cue box is at left edge of screen. Entire box is offscreen. | Bottom edge of cue box is at top edge of screen. Entire box is offscreen. |
| position:0%,line-left align:end | Right edge of cue box is at right edge of screen. | Top edge of cue box is at top edge of screen. |
| position:50% align:start | Left edge of cue box is at horizontal center of screen. | Top edge of cue box is at vertical center of screen. |
| position:50% align:center | Center of cue box is at horizontal center of screen. | Center of cue box is at vertical center of screen. |
| position:50% align:end | Right edge of cue box is at horizontal center of screen. | Bottom edge of cue box is at vertical center of screen. |
| position:100% align:start | Left edge of cue box is at right edge of screen. Entire box is offscreen. | Top edge of cue box is at bottom edge of screen. Entire box is offscreen. |
| position:100%,line-right align:start | Right edge of cue box is at right edge of screen. | Bottom edge of cue box is at bottom edge of screen. |
| position:100% align:center | Center of cue box is at right edge of screen. Right half of box is offscreen. | Center of cue box is at bottom edge of screen. Bottom half of box is offscreen. |
| position:100% align:end | Right edge of cue box is at right edge of screen. | Bottom edge of cue box is at bottom edge of screen. |
The line cue setting is used for vertical positioning of the top of the cue box (if the text direction is horizontal) or horizontal positioning (if the text direction is vertical). The value can be expressed as an integer or a percentage. If an integer, it represents the number of lines from the left, top, or bottom edge of the screen, depending on text direction.
Integer values can be positive or negative. For example, if the text direction is horizontal, line:2 means two lines down from the top of the screen, and line:-2 means two lines up from the bottom of the screen. If the text direction is vertical:rl, line:2 means two lines from the right edge of the screen, and line:-2 means two lines from the left edge of the screen. If the text direction is vertical:lr, line:2 means two lines from the left edge of the screen, and line:-2 means two lines from the right edge of the screen.
Percentage values are from 0% to 100%, and they represent the distance from the top, left, or bottom edge (depending on text direction), as a percentage of the screen width or height. For example, if the text direction is horizontal, line:10% means 10% of the distance down from the top of the screen, and line:90% means 90% of the distance distance down from the top of the screen (i.e. 10% of the distance up from the bottom edge). If the text direction is vertical:rl, line:10% means 10% in from the right edge of the screen. If the text direction is vertical:lr, line:10% means 10% in from the left edge of the screen.
Size
The size cue setting specifies the width of the cue box (for horizontal text direction) or the height of the cue box (for vertical text direction). The value must be an integer percentage from 0% to 100%. For example, if the text direction is horizontal, size:80% means that the cue box takes up 80% of the width of the screen. If the text direction is horizontal, size:80% means that the cue box takes up 80% of the height of the screen.
Regions
Regions allow you to define a cue box with a specific location, geometry, rendering style and format and then put captions into that box with only a single statement. Regions add the following capabilities:
- Support rollup captions.
- Easily change the layout, format, and rendering behavior for groups of captions without having to modify individual cues.
- Style the region’s background and border differently from the cues it contains.
- Provide more control over the dynamic geometry of the caption box as the font size changes.
- Specify foreground and background regions in cases where they overlap.
Many of the above features help satisfy FCC requirements for Captioning of Internet Video Programming.
The syntax for defining regions is as follows:
REGION
setting1:value1
setting2:value2
...
The settings can be one of the following:
- id
- width
- lines
- regionanchor
- viewportanchor
- scroll
The id setting assigns a unique name for the region. For example, id:rBottomCenter. This ID is referenced from cues to indicate which region they should be rendered into.
The width setting defines the horizontal width of the region, as a percentage of the width of the screen. Currently, regions only support horizontal text direction, so there is no equivalent setting for vertical text. The value must be an integer percentage from 0% to 100%. For example, width:80% indicates that the width of the region is 80% of the width of the screen.
The lines setting defines the height of the region in lines. It must be a positive integer. For example: lines:3 specifies that the region is three lines high. This setting is useful for limiting the number of lines of rollup captions that can be shown at one time.
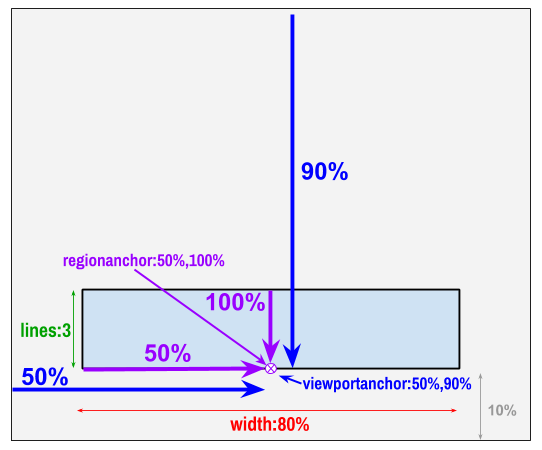
The regionanchor and viewportanchor settings are used together to define the position of the region on the screen. The regionanchor setting defines a point within the region that will be pinned to a location on the screen. The viewportanchor setting specifies the location on the screen where the regionanchor will be pinned to. The values of both settings are formatted as “x%,y%” where x and y are positive integers between 0 and 100.
For regionanchor, the values indicate the percentage of region width in from the left edge of the region (x%) and percentage of region height down from the top edge of the region (y%). For example, regionanchor:0%,100% specifies that the anchor point for the region is its lower left corner.
For viewportanchor, the values represent a location on the screen in terms of percentage of width from the left (x%) and percentage of height from the top (y%). For example, viewportanchor:10%,90% specifies a point close to the lower left corner of the screen (10% in from the left and 10% up from the bottom).
The concept of region and viewport anchors is analogous to pinning a sheet of paper on a bulletin board. The regionanchor is where you stick the pin through the paper, and the viewportanchor is where on the bulletin board you stick the pin in. For example, suppose we want a region with the following geometry and position:
- The bottom edge of the region is 10% up from bottom edge of screen.
- The width of the region is 80% of the width of the screen.
- The region is 3 lines high.
- The region is horizontally centered on screen.
- Text scrolls up from the bottom (i.e. rollup captions).
To accomplish this, we could define the region as follows:
REGION
 id:rBottomCenter
 width:80%
 lines:3
 regionanchor:50%,100%
 viewportanchor:50%,90%
 scroll:up
The following diagram illustrates how the width, lines, regionanchor, and viewportanchor attributes relate to the desired positions and geometry.
The scroll setting defines how subtitle text is rendered within the region. Currently, there is only possible value: “up.” If scroll:up is specified, new cues will be inserted at the bottom of the region, pushing older cues up until they scroll off of the screen. See Rendering Style below for more details.
Regions are defined in blocks following the header, as shown below:
WEBVTT
Kind: captions
Language: en-US
...

REGION
id:rLowerLeft
width:40%
lines:3
regionanchor:0%,100%
viewportanchor:10%,90%
scroll:up

REGION
id:rLowerRight
width:40%
lines:3
regionanchor:100%,100%
viewportanchor:90%,90%
scroll:up

...
Each region block is terminated by a blank line.
Rendering Style
WebVTT supports three ways of rendering captions:
- pop-on
- roll-up
- paint-on
With pop-on captions, the entire cue appears all at once (at the specified start time) and disappears all at once (at the specified end time). This is the default mode for rendering captions and is the most common rendering mode for web videos. In WebVTT, pop-on captions are the default rendering style.
Roll-up captions are rendered one line at a time at the bottom of the caption box. Each new line pushes up the existing lines until they scroll off of the top of the box. This rendering style is typically used in live television broadcasts, which is where the term closed captioning originated. With live captioning, the bottom line is often progressively rendered, one word at a time. In WebVTT, roll-up captions are rendered one entire line at a time.
To use roll-up captions, a region must be defined and include the scroll:up setting. Then, each cue should reference that region, and the cues should have overlapping times with durations long enough to keep the cue visible until it scrolls out of the box. The following example shows roll-up captions:
Example of roll-up captions
Paint-on captions appear one word or phrase at a time. They are also called karaoke-style captions, since that is a common use for them. WebVTT supports paint-on captions through use of timestamp tags that are embedded in the cue payload (text). Timestamp tags must be greater than the cue’s start time, less than the cue’s end time. If a cue contains multiple timestamp tags, they must appear chronologically. That is, each timestamp tag must be greater that the previous one. At the cue’s start time, the first section of text (up to the first timestamp) is displayed first. At the time indicated by the first timestamp tag, the second segment of text (up to the next timestamp) is displayed, and so on until there are no more timestamps. For example:
WEBVTT

00:00:14.500 --> 00:00:21.000
I<00:00:15.500> can't<00:00:16.000> get no<00:00:18.000> sat<00:00:18.750>tis<00:00:19.250>faction

00:00:21.500 --> 00:00:27.000
I<00:00:22.500> can't<00:00:23.000> get no<00:00:25.000> sat<00:00:25.750>tis<00:00:26.250>faction

00:00:27.000 --> 00:00:34.00
'cause I try<00:00:29.000> and I try
<00:00:31.000> and I try<00:00:32.750> and I try
In the above example, each word or phrase is rendered as it is sung. To provide a better readability while still preserving the paint-on nature of the captions, we can show the entire caption, but just paint portions of the text different colors to indicate the word or phrase currently being spoken or sung. For example, when the cue payload text is first shown on the screen, it would be colored grey to indicate that it is future text. When the first timer fires, the corresponding text becomes active and is changed to blue. When the subsequent timer fires, a new segment becomes active. The old active segment becomes past text, and is changed to black. Thus, future text would be shown, but not emphasized, active text (currently being spoken/sung) would highlight in blue, and past text would remain on the screen, but no longer be highlighted. In order to accomplish this, WebVTT defines two pseudo-classes: :past and :future. For the example at hand, the two classes would be defined in the CSS as follows:
::cue:past {
 color:black
}

::cue:future {
 color:grey
}
This rendering style would be particularly useful for karaoke. Beyond karaoke, paint-on captions in general are helpful for conveying the cadence of music or speech to the hearing-impaired.
Example
The following video shows an example of what you would get if you ordered Speechpad’s Standard Captions. After you begin playing the video, click the “CC” on the video player to turn the captions on. The text box below the video shows you the WebVTT file for those same captions. WebVTT is just one of many formats you can download once the captions have been created. You could then use the WebVTT file to allow various players and video hosting services to present captions with your video (see compatibility list below).
WEBVTT

00:00:03.400 --> 00:00:06.177
In this lesson, we're going to
be talking about finance. And

00:00:06.177 --> 00:00:10.009
one of the most important aspects
of finance is interest.

00:00:10.009 --> 00:00:13.655
When I go to a bank or some
other lending institution

00:00:13.655 --> 00:00:17.720
to borrow money, the bank is happy
to give me that money. But then I'm

00:00:17.900 --> 00:00:21.480
going to be paying the bank for the
privilege of using their money. And that

00:00:21.660 --> 00:00:26.440
amount of money that I pay the bank is
called interest. Likewise, if I put money

00:00:26.620 --> 00:00:31.220
in a savings account or I purchase a
certificate of deposit, the bank just

00:00:31.300 --> 00:00:35.800
doesn't put my money in a little box
and leave it there until later. They take

00:00:35.800 --> 00:00:40.822
my money and lend it to someone
else. So they are using my money.

00:00:40.822 --> 00:00:44.400
The bank has to pay me for the privilege
of using my money.

00:00:44.400 --> 00:00:48.700
Now what makes banks
profitable is the rate

00:00:48.700 --> 00:00:53.330
that they charge people to use the bank's
money is higher than the rate that they

00:00:53.510 --> 00:01:00.720
pay people like me to use my money. The
amount of interest that a person pays or

00:01:00.800 --> 00:01:06.640
earns is dependent on three things. It's
dependent on how much money is involved.

00:01:06.820 --> 00:01:11.300
It's dependent upon the rate of interest
being paid or the rate of interest being

00:01:11.480 --> 00:01:17.898
charged. And it's also dependent upon
how much time is involved. If I have

00:01:17.898 --> 00:01:22.730
a loan and I want to decrease the amount
of interest that I'm going to pay, then

00:01:22.800 --> 00:01:28.040
I'm either going to have to decrease how
much money I borrow, I'm going to have

00:01:28.220 --> 00:01:32.420
to borrow the money over a shorter period
of time, or I'm going to have to find a

00:01:32.600 --> 00:01:37.279
lending institution that charges a lower
interest rate. On the other hand, if I

00:01:37.279 --> 00:01:41.480
want to earn more interest on my
investment, I'm going to have to invest

00:01:41.480 --> 00:01:46.860
more money, leave the money in the
account for a longer period of time, or

00:01:46.860 --> 00:01:49.970
find an institution that will pay
me a higher interest rate.
Compatibility
The WebVTT file format is supported by most video players, streaming platforms, authoring tools, editing software, including:
- YouTube
- Microsoft Player Framework
- VLC
- Brightcove
- Vimeo
- Adobe Premiere Pro
- Adobe Encore
- Apple Compressor
- Final Cut Pro
- DVD Studio Pro
- iTunes
- Kaltura MediaSpace
- Viddler
- Flowplayer
- thePlatform
- MediaCore
WebVTT captions are available with either of Speechpad’s captioning services: Standard Captions or Premium Captions.